
In this video, Paulette shows you the easy way to create squares inside squares with nice mitered corners. It’s an easy “disappearing” quilt block trick, and she’ll show you how to vary the sizes to make them however you want. She’s using a beautiful fat quarter bundle from our stash. It is Dogwood Trail II by Sentimental Studios, for Moda. You can still find some of the fabrics if you scour the internet!
Here’s all of the measurements:
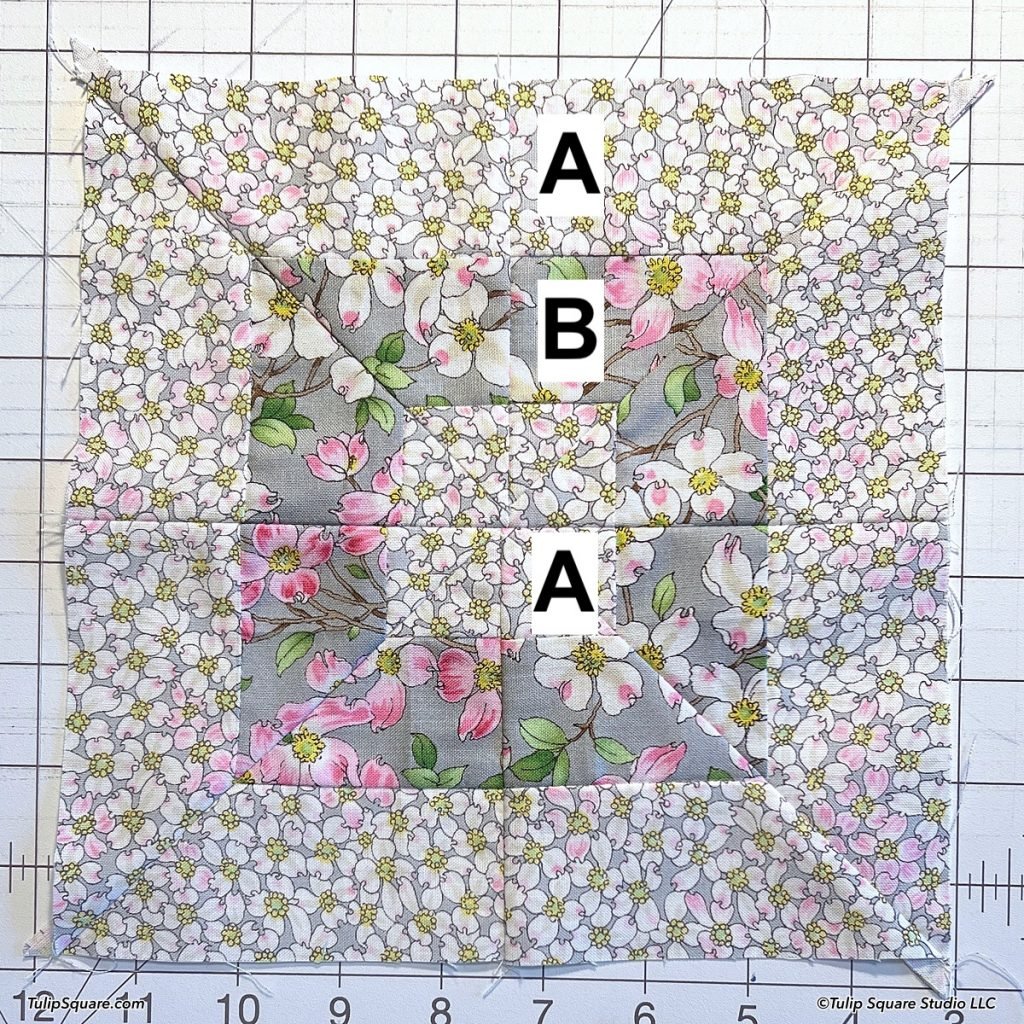
For the first block (8-1/2 inches – 8 inches finished):
Fabric A:
Cut 8: 2 x 5 inch
Fabric B:
Cut 4: 2 x 5 inch
For the second block (14-1/2 inches – 14 inches finished):
Fabric A:
Cut 8: 2 x 8 inch
Fabric B:
Cut 8: 2 x 8 inch
Fabric C:
Cut 4: 2 x 8 inch

For the third block (11-1/2 inches/ 11 inches finished):
Fabric A:
Cut 8: 2 x 6-1/2 inch
Fabric B:
Cut 8: 1-1/4 x 6-1/2 inch
Fabric C:
Cut 4: 2 x 6-1/2 inch

How to calculate sizes:
Here’s a good guide to follow to figure out what size strips you need. Take the desired size of your finished block, and add 2 inches. Then divide that number in half. That is how long your strips should be. For example, if you want a finished 8 inch block, you add 2, that makes 10. 10 divided by 2 equals 5, so your strips should be 5 inches long.
Video transcript:
Hi everyone I’m Paulette Morrissey from Tulip Square, and this week I’m going to show you how to take the mystery out of doing mitered corner quilt block squares. Here’s one with mitered corners, kind of a cool little design, and once you figure out how to do it, it’s very easy. It’s another one of those kind of patterns that if you take a couple of simple pieces, and you sew them together and then you cut them apart and sew them back together in a different way, you got a whole cool looking block. And these look a lot more difficult than they are, and they’re very impressive looking in a table runner or placement, or quilt if you had a whole quilt full of these things, very cool. So we’re going to head over to the sewing machine, and we’re going to learn how to do mitered corner blocks. Let’s go.
Okay to make mitered corner quilt block squares, they’re very easy once you get the basic concept down. I’m going to go through quickly three different variations so you can get the idea of how you can vary things and still get really good results. I’m going to start with only a three stripe block, and for this one I’m using strips that are 2 inches wide and 5 inches long. Now this will work with other sizes, but this this particular one is 2 inches by 5 inches and I’ve got four of one color and eight of the second color. So what I’m going to start by doing is, for each of these four bigger bold print, I’m going to sew with very nice careful quarter inch seams, I’m going to sew one of the smaller prints to each of these along a long edge. So we’re going to do some quick sewing over here.
It’s very important that your seams are nice accurate quarter inch seams so when you’re putting together the mitered corners everything lines up well.
So I’ve got them all pressed open. I’m going to take the remaining four pieces of the smaller print, and I’m going to sew them to the other side of the bigger print, like so. I’m going to go sew those, make sure we do nice accurate quarter inch seams again. I’ve pressed them all open and I want to point out that on the back, rather than pressing them both towards like this darker color, I’m pressing everything in one direction and that will be explained why that’s a good thing to do as soon as we do some cutting. Okay now this is one of those quilt patterns that is one of those cool things that if you start with some simple blocks and you do a little bit of cutting and sewing back together you get something really cool. So that’s what this is. So what I’m going to do is go cut these up and I will be right back and I’ll show you what I cut.
All right, so I cut up the block. So you started with four little squares and each one is made up of three stripes. So what you’re going to do is, you’re going to take two of these squares and you’re going to cut them like so, from lower left to upper right. Lower left to upper right, and then you’re going to take the other two squares and you’re going to cut the opposite. You’re going to cut lower right to upper left, and lower right to upper left, just like so. Then you’re going to trade pairs. I’m going to trade this one with this one, and I’m going to sew this to this, and this to this, and then I’m going to trade these two. I’m going to sew this one over here, and this one over here. So now I’m going to go and sew those together on the diagonal. And when you sew the diagonals, make very sure that your seams line up in here. Those two lines and those two, and this is why we did all this, the ironing, pressing this one this way, because then the other side gets pressed this way and they nestle beautifully. So you pair them up like this, and you sew all your diagonal lines, quarter inch seams very accurate.
I’m going to press these seams open, and once again I’m pressing them all the same way, so every one of these pressing the same way, so after you put those together you’ve got four squares that look like this. Just like this. So what you do with these is you sew them together in pairs. This one and this one, so your middle big print is meeting each other, and you just sew those two squares together.
Now we have two pieces like this. You turn them around, sew them together, and there you have a square with beautiful mitered corners. Now in looking at this I can see that it’s not all that much of a big contrast so my next sample I’m going to show you with some better contrast, because this is not all that exciting. Also I want to point out that this was done with only three stripes on your fabric, so the next one I’m going to do I’m going to use five stripes of fabric. So we’re going to take these colors here, and we’re going to do five stripes of fabric, and I’ll show you how that works. So we’ll set aside our smaller one, and these are also 2 inch strips but this time they’re 2 inch by 8 inch and I’ll explain the thinking behind that in a minute, but what you have to understand, and it’ll be more obvious in this one, I need four of the bold pattern and eight each of the other two. Whenever you’re making any of these kind of squares, when you want them to look nice and uniform like there’s a square within a square within a square, you have to make, the block has to be uniform from either direction. Like these are going to have to be like this, they have to have one of this color on the outside, followed by this color, and this color in the middle. You can’t mix them up and go like this or anything, it has to be the same from both directions and meet in the middle. So you have to use an uneven number of strips. You can use three strips, five strips, seven strips, nine, whatever you want but they have to be so they match like this, and come to the middle with the same color. And you can also vary the width as long as it’s uniform, like these could be two inch, these could be one inch, this could be four inch, but they have to be uniform from both directions. So for these we’re going to sew these two pieces, the ones that you have eight, eight pieces of, we’re going to sew these together in pairs. Remember these are 2×8 inches so we’re going to sew these together in pairs. Okay and now have eight strips like this with two colors on it. Then I’m going to take these pieces and sew them to half of them. All right now we have four strips like this, and we still have four strips with only two pieces, so now you have to sew this one to here, so that they’re uniform from both sides. You’ve got dark print, light print, bold print in the middle. So we’re going to sew all of those so this last one ends up in the middle of every square. Now we’ve got okay now we’ve got four squares like this, and we’re going to go cut them all in diagonal. I’ll be right back. Okay just like with the smaller squares, here was our five striped square and here was another five striped square, and we cut two of them this way, lower right to upper left, and two of them this way, lower left to upper right, just like that. And then what we do is we trade them. We take this one and put it here, and this one and put it here, and sew those together diagonally. When you’re sewing these diagonal seams be careful not to stretch the fabric as you sew it, because diagonally the fabric does have a lot of stretch. So just carefully line up your your seams and just help the fabric along but don’t pull at it. I’m going to go iron these open. Now you have four squares that look like that, and if you were doing careful quarter inch seams your corners should line up pretty good. Most of mine do. They’re not perfect, but they’re pretty good. So now we’re going to put these together like so, in pairs, and sew two pairs together sew these two, and these two.
Now I’m going to sew these two halves together and then we will have a big beautiful block. And there you got a big beautiful mitered corner block. And see how easy it is to make these mitered corners like that, big ones, little ones, three stripes, five stripes, and I’m going to do one more quick one to show you what it looks like if you use different widths of strips. So I’ve got eight of these, and eight skinny ones, and four of these, and these are these are 2 inches wide and these are one and a quarter inches wide and they’re all six and a half inches long.
The length is determined by how wide they would be after you sew these together.
I’m going to put, oh let’s see what I’m doing. I’m going to put these like this, and one like this, because remember you always have to work in an uneven number, and you always have to work uniformly from both sides towards the center. So after I’ve got two inches, two inches, two inches, inch and a quarter, inch and a quarter. After you’ve sewn all their seams and everything these will be three quarters of an inch, these will be an inch and a half, but since the outside edges are not used yet you’ve got to add a half an inch to that which means these pieces when they’re sewed together will be six and a half inches wide. So it has to be six and a half inches long. So I’m going to sew these together in pairs. I’m going to sew all of these to these little strips, and we’re going to set the bold ones aside and we’re just going to sew all eight of these. And we’ll just whip through this one really quick because it’s the same process as the other two, just varying the width of the strips.
I’m going to sew our center strips to this stripe right here, on four of them.
Now we sew the other pieces to the opposite sides of the center pieces like so. Now we have four blocks like this, and I’m going to go cut them. So once again I cut two of them this way, lower right to upper left, and two of this way, lower left upper right. And you’re going to swap out the pairs and sew them together diagonally. And be sure you don’t stretch the fabric when you’re sewing diagonally, because it’s very stretchy on the diagonal, more than happy to stretch out of shape if you let it.
And there you have it! Mitered corners all the way around. And like all of these blocks I recommend when you get to that final seam, it’s probably best to press that seam open, just because there’s a lot of bulk right in that little corner there. You can even cut these little guys off if you want. But there’s your square. So I hope I have demystified mitered corners for you, and I hope you will give it a try, to start with three squares, three stripes, five stripes, whatever you want, but remember the main three things you have to remember, is it has to be an uneven number of stripes, you have to have the same going from both directions, so it’s like color A, color B, and they meet with C in the middle, it has to be the same like that, and your seams need to be accurate quarter inch seams so that all of your little lines end up even.
So that’s about all there is to it! Go have some fun.
So now you all know how to make mitered corners. Kind of a cool little design, makes a pretty neat looking block that looks a lot harder than it was. You can see you start with just some simple stripes, cut them apart and sew them back together. An awesome method always for making interesting looking blocks. And just to give a little recap, the smaller ones that were two inch, that strips were 2 inches by 5 inches, and when you do three pieces like that it ends up to be an 8 inch block after the edges are sewn into something. Right now it’s 8 1/2 inches but it would be an 8 inch block. These pieces like this one were six and a half inches long, and both of this one, well this one anyway or 2 inch, one and a quarter, 2 inch, these are 2 inch, one and a quarter, 2 inches, one and a quarter, and 2 in, and they were all six and a half inches long, and this will end up to be a 14 inch* block. It is 14 and 1/2* inches right now because it’s still got it’s two quarter inch edges. (*This is incorrect, this block is 11 inches finished, 11-1/2 now. Oops!) And this great big one I made was all 2 inch squares, 2 inch by I believe 8 inches and when it’s all put together it was going to be a 14 inch block. And play around with sizes that you like to do. Just remember they have to be the same from outside to inside, because when you’re sewing the two reverse halves together, if they’re not lined up they’re not going to make it a whole square like that in the middle. So do that and make sure you have to use an uneven number of squares, of stripes so that there is a middle stripe on each one, and accurate quarter inch seams. I hope you enjoyed that, I hope it took a little bit of the mystery out of mitered corners which can sometimes be a little intimidating looking, and if you like this video please hit the Subscribe button, hit the little bell if you want to be notified when we have new videos, hit the like button, and remember that we put out a new video every Saturday. So, be back Saturday with something new. We’ll see you then bye-bye!